A Sand Tart by any other name

…wouldn’t be a Sand Tart.
However… all Sand Tarts are not the same, I have discovered. 
When our friend Tim G. gave us his mothers personal recipe
for Sand Tart cookies last year,  I think it was my favorite gift. 
This is definitely an heirloom cookie. 
It’s like no other recipe I have googled… and I did some googling because
I had never heard of “sand tarts” before….and OOOH MAN
the ones he brought over for us to sample were out of this world. 
What I found on the internet were recipes like this…

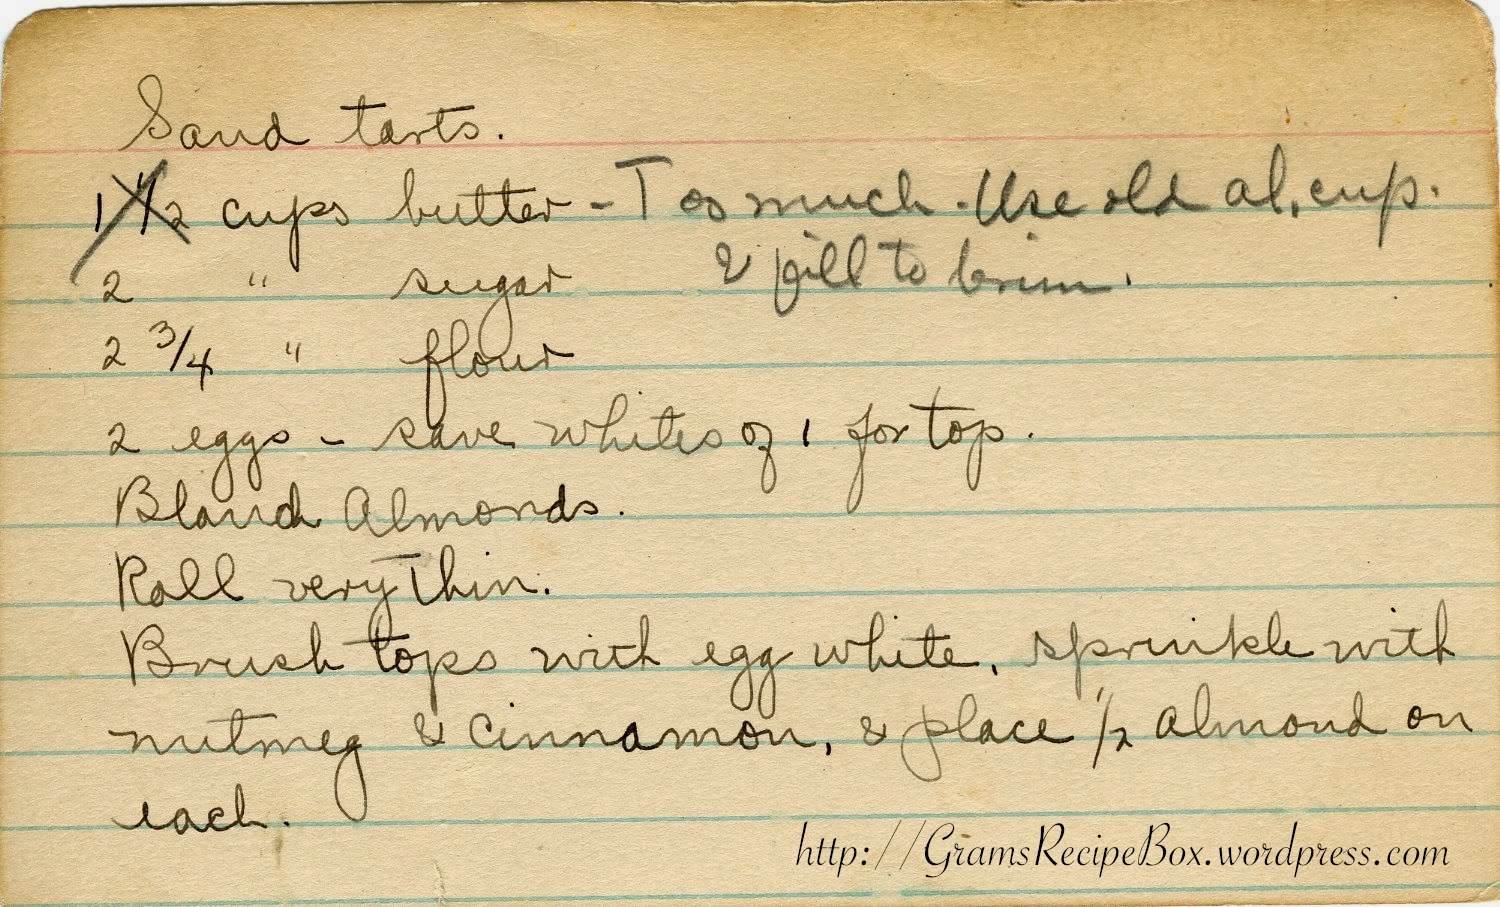
and they tend to look like this…

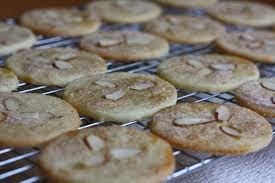
All, I’m sure, are delicious.  But none are quite like Mrs. G.’s 
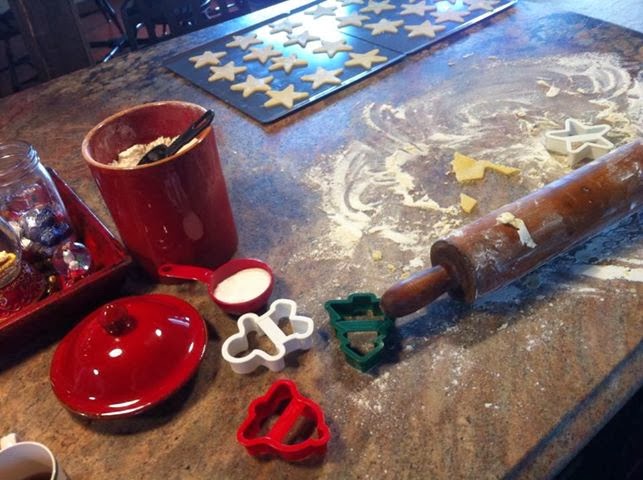
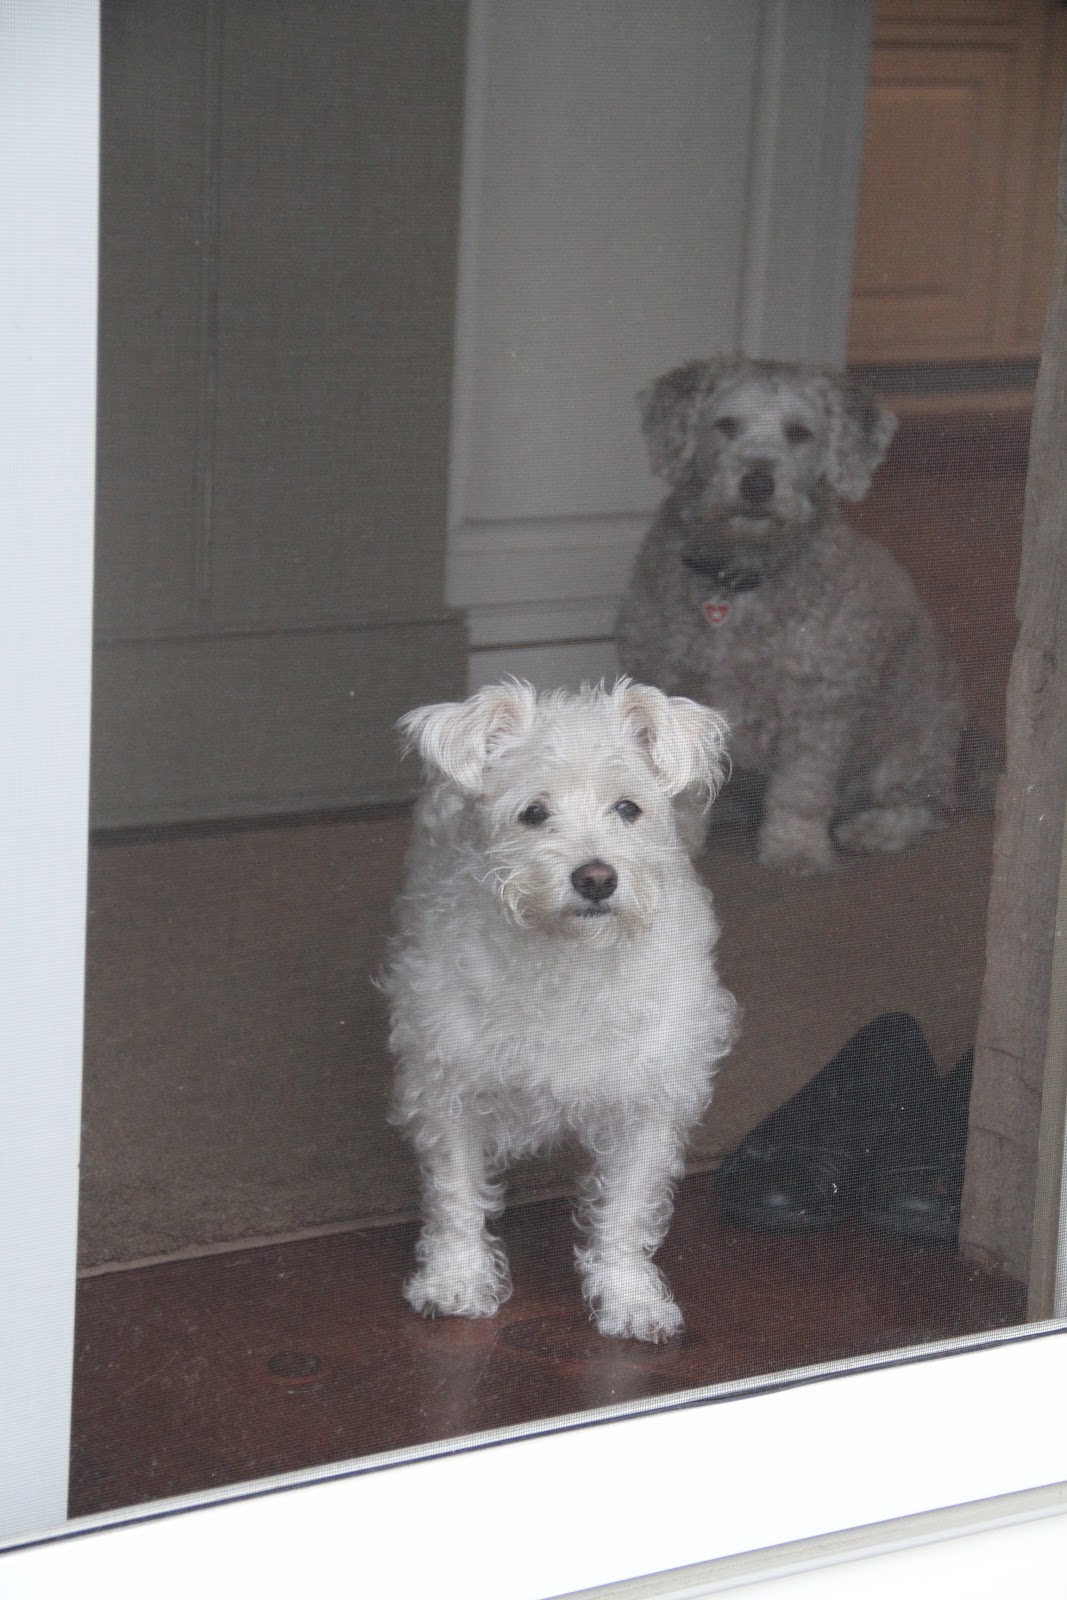
Yesterday we got that lovely snow/slush/rain storm and the dogs and I
spent the day in the kitchen making Mrs. G.’s Sand tarts. 
There are no nuts in this recipe…
a whole lot of butter, sugar, flour – 
and a whole lot of steps to get there. 
I tripled the batch and it took me four and a half hours from the mixing of dough,
 to the chilling, rolling, cutting out, baking cooling, making the icing and dipping in sugar.
Ah,  those final steps are the secret to these particular Sand Tarts…
 and I’d give you the recipe, but then I’d have to kill you.

Frasiers already had too many cookies, wouldn’t ya say? 
The men are all out shoveling and plowing…
The girlchild and I just came in from barn and coop chores and it sure is messy out there. 
One more batch of cookies today and we’ll have a really nice mix
 to put together for friends.  
Are you a christmas cookie baker?
What’s your favorite kind?  Feel free to share a link to a recipe in the comments section below. 
 It’s a new day, All – Stay warm and make it a good one

The Good in Life

We were invited to share a lovely evening filled with delicious food, great friends,
a gathering of community minded people who I am so blessed
to call friends. Uplifting, it was. 
Thank you, Tim & Eileen, for doing that thing that you always do –
Bring people together in such a positive way.
A few scenes around this old house this weekend – 
The moon rises as the reflection of the setting sun glows in the family room window…
 
Bailey naps – always reminds me of my favorite Andrew Wyeth print.
I bet some of you know which one I’m talking about. 

We now actually USE this big fireplace since the arrival of the sectional couch in the family room.
 
Ask me how much I love finally making a good furniture decision.
🙂 

My new project, coming along slowly…
original photo above, attempt in oils below…
 
I hope you are all enjoying a peaceful Sunday – 
I’ll be looking toward the Thanksgiving table and menu ideas…
 Any suggestions for something new to add to the menu??…
Even an easy appetizer??
leave a link to the recipe below in the comments section if you’re so inclined.
I’d love to hear them. 
 

Window Treatment

 Pretty, right?
Reality check…
waxed paper works sometimes, if you press the leaves for atleast five minutes.
If you don’t.. the leaves turn brown and crispy pretty quickly. 
Dipping the leaves in melted wax  a la – Martha Stewart – works better.
Apparently I’m no Martha.

It’s the little things

   My son went to the Guilford Fair last night with a few of his friends.  I asked him to check the arts tent to see if my photograph had been hung and if it had gotten any placement.   He called home around 10pm to tell me it had won first place. Not only that, many others had submitted four or five photographs each, but my single shot got the blue.

   This is really just a little thing, but I struggle to accurately express the magnitude of how it lit up my world last night, this acknowledgement, this nod to my simple picture, this little blue ribbon.

   What makes it extra special for me is that it’s a photo I took of Eddie and Phils clam rakes in Joshua Cove.  This photo is not typical of what is entered in these competitions… you see a lot of beautiful landscapes, flower arrangements, moon shots, wildlife photography, etc. In comparison this picture is kinda simple… but  drew me in right away when I saw the shot out there on the water,  the industrial strength of their rakes, a basic tool that does a lot of work, and the beauty in  the delicate grooves and the blue, gray and purple hues of the clam shells themselves.  Reminds me of the simple beauty in the story of Eddie and Phil.

  One of my favorite quotes…

“It’s not what you’re looking at that matters.. .it’s what you see”

I hope they still read my blog, because I’d like them to know their kindness that day brought home a blue ribbon from the 154th Guilford Fair and made this woman’s day.

About those Ribbons

   This year K and Max showed in a breed specific circuit – Quarter Horse.  The competition is tougher than the Open shows and the stakes are higher.  There are points awarded for placings and money earnings as you move up the ranks, travel around the country and hopefully win big.  There’s no doubt it’s big business if you’re serious about it, and most people who participate are serious about it.

    That right there is where we sorta fall off the proverbial show wagon, because truth be told… we’re just enjoying the horse we love and setting relatively small goals.  We don’t travel far from home and we don’t like to put big stress on the horse or our person or the wallet, it just doesn’t feel right.   I also think we lack the competitive drive that most horse people have that spurs you forward to achieve higher success in the show ring.  I guess it’s a matter of.. if the  boot fits, wear it. If not, find a less imposing boot.

   One other little thing –   It’s still a thrill for us when your name is called at the end of a class and you’ve learned your placing…and you grab that ribbon with joy, regardless of the placing.  Oh, the blues are definitely the best, but we love them all… blue, red, yellow, white, pink, green.  At Quarter Horse shows, the ribbons are not a priority, partly because these folks go to so many shows and have earned so many ribbons they’ve probably run out of room for storing or displaying them.  It’s more about the points and qualifying, and I totally understand that mentality.  Perhaps we show our green status when we bounce up the secretary booth stairs to pick up of those ribbons, but I don’t care, I don’t want to give up that simple thrill.

   When I was a young girl we didn’t live where I could have a horse.  I visited my Aunt in Connecticut every summer for a week or two and one day she brought me to one of her sons horse shows and put me on a friends horse. He was a big palomino and a kind old fella  name Diesohab (I’m sure that is spelled wrong, it was an Indian name). My  borrowed “show clothes” look awkward in the one picture taken but the huge buck-toothed smile on my face is evidence of the pure joy I felt that day. How I loved that horse and  that one green satin ribbon.

   So.. what to do with those ribbons as they start accumulating?  I found some neat ideas on line and took matters into my own glue-gun wielding hands…

This one is for my girl.. and includes ribbons from the different shows she has
been to over the years…
I made this one for the barn, but I just know the cob webs will smother it.
Might keep it in the house somewhere…
On a side note… little brother, who’s not so little anymore..
went with big sister to visit Max the other night. 
I love when I see this… my two children who fight more often
than not… doing something together to support one another. 
It’s a beautiful thing. 
(eye rolls and heavy sighs not permitted if either of you are reading this.)
Now that’s some serious horse power. 
Ever been on a horse?… come take a ride on Max..
this is a slow lope in western speak. 🙂


Giving it another go

 Back in the day… I played musical instruments and I drew and painted stuff. I had the time to nurture creativity and I dreamed of doing that for a living.   Then reality took over —  grown-up life got hectic with a job, then marriage and a  family to raise..and of course the farm life with the work that entails. I’m not complaining, it’s all good.

 Now that the family is just about grown and I don’t have to punch a clock at an office somewhere… I want to encourage my creative side again.  I’d love to pick up an instrument  and play again, but my hearing impairment hampers that tremendously.  I have  no excuse not to pick up a pencil or paint brush though, and at the beginning of the summer I had a moment.   I was kayaking down the Menunketesuck River with camera in tow… and  witnessed this moment of  morning summer light and reflection on water that I felt could be a painting.  So I took the picture and studied it at home.

 Then I went to the art supply store and held the photo up to the girl working behind the counter.  I said…” I want to paint this. Help me. ”     You see… when I was younger I painted and then quit, because my work was flat. There was something missing in the depth of it all.   I asked her to set me up with the right equipment to paint this painting, and I’ll see if I can figure it out this time.

 We walked around the store as she picked this and that out, just the basics to start  me off.  She only pulled about eight colors off the paint rack… (oils) … and didn’t grab black.   I said… “Don’t I need black for this painting?”… and she replied… “Well, you can buy one if you want, but here is something I learned in my painting classes……. NEVER use straight black.  MAKE it… using other colors.   In nature, there is no black… there is light reflecting off objects, which creates the colors you see.  Also….. the trouble with  oils is most people don’t have the patience to let the layers dry.  Work from back to front, background to foreground”.  

  It was an  AHA!  moment for sure.

So I brought my supplies home and set up the easel in my living room. I got to work and this time had the patience to let the layers dry as I went… setting the whole thing aside for days at a time (oils take days to fully dry).  I created the areas of darkness (not black!)  with Raw Umber, reds, greens and blues. Go figure.

 And holy cow, just like that, my painting was no longer – flat – 


  Now, I’m no professional artist, but I’m happier with the results and it feels so good to nurture creativity in this way again… all these years later.

Original photo

My set-up in the family room at home…
Preliminary sketch and background layer.
(that’s not black!)
Some of the background complete…
The next layer … 

and after a few weeks of messing around and drying time and re-doing this and that..
I have completed my first little painting once again.
It’s not perfection, it’s not a mirror image of the photo I originally took…
But…
This time, I see some depth. 
I want to give that young woman a hug. 
So if you had a hankering years ago to create something of your very own
or try some new adventure that’s out of  your own personal ordinary…
don’t give up on it altogether.. even 20 -30  years later.
Pick it up again, see what you can do with it.  It’s food for the soul, I’m telling ya – 
Why..ever.. not?

Mini Kitchens

A person could spend hours and hours
looking for ideas on the internet.
I’m doing my best not to get too tangled up in the world of miniatures
as I fix up my fixer-upper dollhouse…
These are just a few pictures of kitchens others have put together…
Are you a fan of modern furniture?…
There’s stuff for that.
How about Shabby Chic?..
there’s stuff for that too…
You might remember a gorgeous mini sink I was coveting..
but the price tag was $75. or something like that.
Ain’t happening here.
See the sink in the pic above?
I found one just like it for $9. 
Do you like a rustic country kitchen?
There’s stuff for that too…
I just love this room above, someone put alot of time and thought
into putting that together. It looks real, doesn’t it? 
Then there is the clean country chic look…
Can you believe the details in this elaborate room??
I’m going for a simple country shabby look.
I have picked up a few pieces, none of which were crazy expensive and
some of which I’ve made myself.
Here’s a preview…
This is a photo of the Edgartown Light house on Marthas Vineyard.
(one of our favorite places on earth)
I shrunk the picture down in photoshop to 2 inches by 1 1/2 inches,
then printed it out… then  used a wide clear mailing tape
and covered the picture with that to give it a -glass over print- look.
The matte was made form a heavy piece of linen paper.
The photo would NOT cooperate this morning,
you’ll have to view it sideways, sorry.  
My sink, with a burlap dust ruffle I’m not sure I love. If I were a crafty seamstress I would have
done a better job, but once it’s in place with other things around it I think it will
be OK. 
The kitchen table and chairs with dish set I found on etsy.
I’m not a big fan of pink, but the dishes came with the table and chairs.
Hmmm.. how to work that into the kitchen scheme without making
it a pinkish room.
I’m thinking a rubbed out muted green for accents?
The living room walls have been a problem. Because this is an old old dollhouse,
there are dents and lumps and bumps in the walls from previous “stuff”
and no matter what paint I put on it, it looks bad.
Wallpaper is a pain in the *ss, to be blunt.
So I decided last night to barnboard that room too, and I painted it a
pickled white.  I think when all is said and done it will have the look I’m trying to achieve.
Toothpicks have been involved in my dollhouse redo – but I’m not telling where.
Honestly, you can look around the house and find things to use.
If you’ve ever thought about doing a project like this,
I highly recommend it.  It can be done on a shoe string budget and with
things you have laying around the house if you use your imagination.
Lots of bargains and supplies available online from elaborate to very cheap.
As you know, I found the dollhouse at a junk shop for $40.!
Time to get breakfast on the table… enough dollhouse drivel for today.
Have a good day, all – as always, thanks for stopping by.

Whats Growing in the Gardens of This Old House

  I saw a picture of a glass mushroom garden on FB a while back, and decided to put something similar together in a bland area of our perennial border.  So… I went to the junk antique places along the shoreline and found a bunch of old glass bowls and vases to construct my own “mushroom” garden.

Do you spy the oddity?
Come closer….
I crazy-glued the bowls to the upside-down vases and then “planted” them about an inch
into the soil.
This one is my favorite, I love the edge on this pretty bowl.
$5. at the thrift shop.
My husband thinks it’s tacky, but I love it.
A really easy, cheap, simple way to dress up any corner of your garden in a unique way.
Lets take a walk in the drizzle….
Now in it’s third year, the perennial borders around the backyard are really taking hold
and multiplying. This spring I added a rock border as an edge to clean it up some.
I’ve potted some plants at the door to the shed…
and the rose bushes and peonies around the little greenhouse are thriving.
Connie… should I be cutting these rose bushes back some or let them go wild?

I had to treat the peonies for ant infestation, for some reason ants love peonie buds.

The greenhouse is empty now that all seedlings have been planted outdoors…
Mike has given the tomato plants much more room to grow this year.
He’s learning as he “grows”… I am so very proud of the farmer he has become.
When I met this man, he wore pristine white sneakers and gold jewelry,
having grown up in the city of West Haven and then a preppy suburban town on the shore.
On our very first date, it was May 5th, 1987, I don’t know why I remember that…
I saw those perfectly clean white sneakers, his perfectly clean Z28 and that gold jewelry
and said to myself…
 uh  oh.
HOWEVER… as time rolled on…
 I like to think I countrified him.
 His love for growing things and enjoying and working the land
has made my love for him grow deeper.
Who woulda thunk it.
If he’s reading this, he’s looking a little incredulous right now
at my blatant display of  unabashed and public affection, right dear? 
In the background of the above picture are onions, lettuce, basil, parsley, oregano and garlic.
These are my Italian Ice tomatoes… they are white!
I’ll let you know how that goes.
Out in the big garden we’ve got tomatoes, peppers, squash, cucumber,
and string beans, peas in the background.
We learned the hard way that raspberry bushes produce every other year.
So the pruning we were doing was ruining that years crop.
Considering four years ago we took this old house down and put her back up,
we’ve come a looong way, baby. The yard is starting to fill in again, and look lived in,
it’s a beautiful thing.
Starry night Viola I have near the birdbath… it’s one of my favorites.
The knockout roses around the foundation of the house are very robust this year.
I over-fertilized them last year and almost killed them.
We Learn as we Grow.
Hopefully we Grow as we Learn.  
Isn’t that the truth in all things life-related.
Bailey and Frasier agree.

Black & White with a splash of color

 I’ve always admired this technique, but never looked into how to actually DO it. I figured it was pretty technical and I have the patience of a -gnat- when it comes to fidgeting around in the various photo programs.. especially Photoshop.   (talk about confusing!.. am I the only one who feels this way about photoshop?)…  Give me picmonkey any day.

But Picmonkey can’t DO this thing, and I saw on a post the other day that a blog friend of mine, Ms. A, figured it out for herself.   I asked her for a tutorial.  For some reason I couldn’t apply her method on my computer, which frustrated the h*ll out of my impatient self.  So I googled and found out exactly how to do it in the dreadful Photoshop.   Much easier than I thought!  Not perfect, I need more patience… (ha!)… but for now, not bad either. 
Now if you’re into this kind of thing but haven’t tried it yet yourself..
here’s the tutorial I found on the net and used for the Photoshop method.
” One of the techniques people most often ask me to teach them is making a photograph like the one on the right that is black and white with one other colour. There are a few ways to achieve this effect but here is the one I find easiest for Photoshop users:

1) Open a suitable photograph, this can be any subject but ideally it needs an area of bright colour that will have an impact when it’s finished while the rest of the photo looks good in black and white.

2) Select IMAGE>ADJUSTMENTS>DESATURATE to turn the photo black and white. But don’t take the photo out of RGB (i.e. don’t convert to black and white or mono) or the next step won’t work.

3) Select the history brush from the tool menu on the left of the screen (usually the fifth icon down in the right hand column), set hardness to 100% and choose a suitable brush size to work with on the section of the photo you want to put in colour.

4) Now use the brush and go over the area you want in colour, the brush will erase the black and white and bring back the colour. You may need to zoom and work close up on some sections. Take your time and change brush sizes if you need to.”

If you do try this, I’d like to post your finished work here… send it to karenthisoldhouse@hotmail.com in the next week or two and I’ll do a post if I get some from any of you.  I’ll give you two weeks to give it a go.